20 KiB
Title: A Low-Tech Solar Powered Server Date: 2018-9-08 Category: solar server Tags: solar power, static sites, energy optimization Slug: solar-powered-server Description: Optimizing a website and server hardware for low energy and solar power. Author: Roel Roscam Abbing Status: draft
[TOC]
Earlier this year we've been asked to help redesign the website of <lowtechmagazine.com>, the primary goal was to radically reduce the energy use associated with accesing their content and to stay true to the idea of low-tech.
This means using technology and techniques of the past, combined with the knowledge of today. Not in order to be able to 'do more with the same' but rather 'to do the same with less'.
In this particular case it means that all the optimizations and increases in material efficiency do not go towards making a website which is faster at delivering more megabytes, but rather a website which uses all the advances combined with specific hardware and software choices to radically and drastically cut resource usage.
Concretely this meant making a website and server which could be hosted from the author's off-grid solar system. https://solar.lowtechmagazine.com/about/ gives more insights into the motivations on making a self-hosted solar-powered server, this companion article on <homebrewserver.club> will show you how to set up the server.
A low-tech website is one:
- that is minimalist in size and its requirements
- that supports older computers and slower networks
- that improves portability and archiveability of the content
Software
Pelican Static Site
The main change in the webdesign was to move from a dynamic website based typepad to a static site generated by pelican. Static sites load faster and require less processing than dynamic websites because the pages are pre-generated and read off the disk, rather than being generated on every visit.
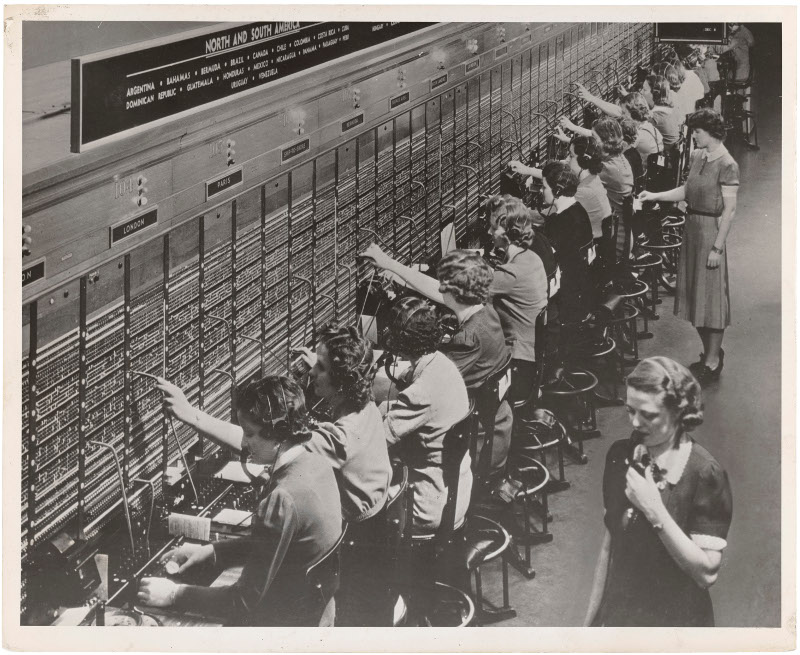 Image from the blog showing 19th century telephone switchboard operators, 159.5KB
One of the main challenges was to reduce the overal size of the website. Particularly to try and reduce the size of each page to something less than 1 Mega Byte. Since a large part of both the appeal and the weight of the magazine comes from the fact it is richly illustrated, this presented us with a particular challenge.
Image compression
In order to reduce the size of the images, without diminishing their role in the design and the blog itself, we reverted to a technique called dithering:
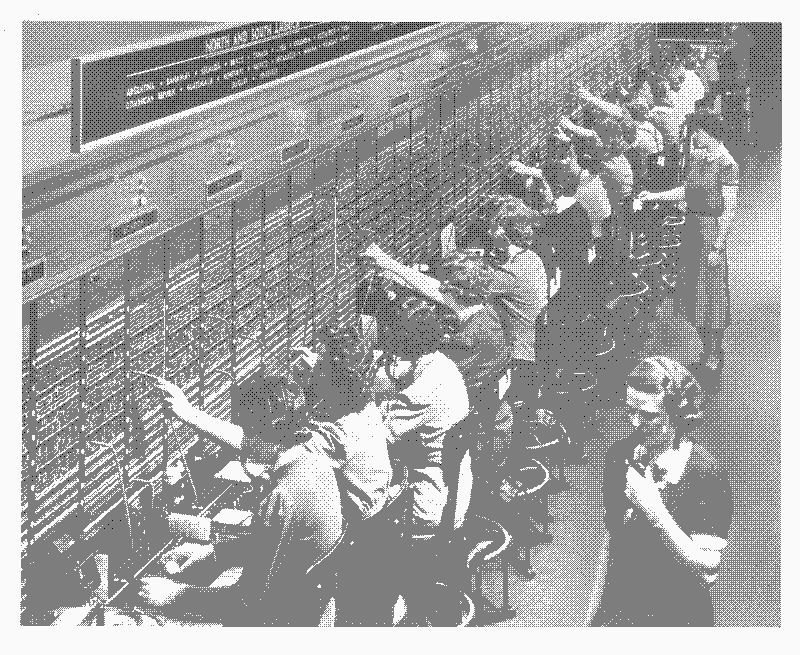 The same image but dithered with a 3 color palette, 36.5KB
This is a technique 'to create the illusion of "color depth" in images with a limited color palette'1. It based on the print reporoduction technique called halftoning. Dithering, or digital half-toning2, was widely used in videogames and pixel art at a time when a limited amount of video memory constrained the available colors. In essence dithering relies on optical illusions to simulate more colors. These optical illusions are broken however by the distinct and visible patterns that the dithering algorithms generate.
 Dithered with a six tone palette, 76KB
As a consequence most of the effort and literature on dithering is around limiting the 'banding' or visual artifacts by employing increasingly complex dithering algorithms3. Our design instead celebrates the visible patterns introduced by the technique. Coincidentally, the 'Bayesian Ordered Dithering' algorithm that we use not only introduces these distinct visible patterns but it is also quite a simple and fast algorithm.
 Dithered with an eleven tone palette, 110KB
To automatically dither the images on the blog we wrote a plugin for pelican to do it for us. This reduced the total weight of the 623 images on the blog by 89% from 194.2MB to a mere 21.3MB.
Off-line archive
TODO
** Dither plugin
** Off-line archive plugin
* LetsEncrypt Certificates
* nginx webserver
    compression
    static file caching policy
    http2
    ssl
* Materialserver scripts
Configuring the webserver
As a webserver we use NGINX to serve our static files. However we made a few non-standard choices to further reduce the energy consumption and page loading times on (recurrent) visits.
To test some of the assumptions we've done some measurements using a few different articles. We've used the following pages:
FP = Front page, 404.68KB, 9 images
WE = How To Run The Economy On The Weather, 1.31 MB, 21 images
HS = Heat Storage Hypocausts, 748.98KB, 11 images
FW = Fruit Walls: Urban Farming in the 1600s, 1.61MB, 19 images
CW = How To Downsize A Transport Network: Chinese Wheelbarrows, 996.8KB, 23 images
For this test the pages which are hosted in Barcelona have been loaded from a machine in the Netherlands. Times are all averages of 3 measurements.
Compression of transmitted data
We run gzip compression on all our text-based content, this lowers the size of transmitted information at the cost of a slight increase in required processing. By now this is common practice in most web servers but we enable it explicitly. Reducing the amount of data transferred will also reduce the total environmental footprint.
:::console
#Compression
gzip on;
gzip_disable "msie6";
gzip_vary on;
gzip_comp_level 6;
gzip_buffers 16 8k;
gzip_http_version 1.1;
gzip_types text/plain text/css application/json application/javascript text/xml application/xml application/xml+rss text/javascript;
A comparison of the amount of data sent with gzip compression enabled or disabled:
| GZIP | MP | WE | HS | FW | CW |
|---|---|---|---|---|---|
| disabled | 116.54KB | 146.08KB | 127.09KB | 125.36KB | 138.28KB |
| enabled | 39.6KB | 51.24KB | 45.24KB | 45.77KB | 50.04KB |
| savings | 64% | 65% | 66% | 66% | 64% |
Caching of static resources
Caching is a technique in which some of the site's resources, such as style sheets and images, are provided with additional headers thta tell the visitor's browser to save a local copy of those files. This ensures that the next time that visitor loads the same page, the files are loaded from the local cache rather than being transmitted over the network again. This not only reduces the time to load the entire page, but also lowers resource usage both on the network and on our server.
The common practice is to cache everything except the HTML, so that when the user loads the web page again the HTML will notify the browser of all the changes. However since <lowtechmagezine.com> publishes only 12 articles per year, we decided to also cache HTML. The cache is set for 7 days, meaning it is only after a week that the user's browser will automatically check for new content. Only for the front page this is disabled.
:::console
map $sent_http_content_type $expires {
    default                    off;
    text/html                  7d;
    text/css                   max;
    application/javascript     max;
    ~image/                    max;
}
Concretely this had the following effects:
The first time a page is loaded (FL) it around one second to fully load the page. The second time, however, the file is loaded from the cache and the load time reduced by 40% on average. Since load time are based on the time it takes to load resources over the network and the time it takes for the browser to render all the styling, caching can really decrease load times.
| Time(ms) | FP | WE | HS | FW | CW |
|---|---|---|---|---|---|
| FL | 995ms | 1058ms | 956ms | 1566ms | 1131ms |
| SL | 660ms | 628ms | 625ms | 788ms | 675ms |
| savings | 34% | 41% | 35% | 50% | 40% |
In terms of data transferred the change is even more radical, essentially meaning that no data is transferred the second time a page is visited.
| KBs | FP | WE | HS | FW | CW |
|---|---|---|---|---|---|
| FL | 455.86KB | 1240.00KB | 690.48KB | 1610.00KB | 996.21KB |
| SL | 0.38KB | 0.37KB | 0.37KB | 0.37KB | 0.38KB |
| savings | >99% | >99% | >99% | >99% | >99% |
In case you want to force the browser to load cached resources over the network again, do a 'hard refresh' by pressing ctrl+r
HTTP2, a more efficient
Another optimization is the use of HTTP2 over HTTP/1.1. HTTP2 is a relatively recent protocol that increases the transport speed of the data. The speed increas is the result of HTTP@ compressing the data headers and multiplexing multiple requests into a single TCP connection. To summarize it has less data overhead and needs to opens less connections.
The effect of this is most notable when the browser needs to do a lot of different requests, since these can all be fit into a single connection. In our case that concretely means that articles with more images will load slightly faster over HTTP2 than over HTTP/1.1.
| FP | WE | HS | FW | CW | |
|---|---|---|---|---|---|
| HTTP/1.1 | 1.46s | 1.87s | 1.54s | 1.86s | 1.89s |
| HTTP2 | 1.30s | 1.49s | 1.54s | 1.79s | 1.55s |
| Images | 9 | 21 | 11 | 19 | 23 |
| savings | 11% | 21% | 0% | 4% | 18% |
Not all browsers support HTTP2 but the NGINX implementation will automatically serve the files over HTTP/1.1 for those browsers.
It is enabled at the start of the server directive:
:::console
server{
        listen 443 ssl http2;
}
Serve the page over HTTPS
Even though the website has no dynamic functionality like login forms, we have also implemented SSL to provide Transport Layer Security. We do this mostly to improve page rankings in search engines.
There is something to be said to support both HTTP and HTTPS versions of the website but in our case that would mean more redirects or maintaining two versions
For this reason we redirect all our traffic to HTTPS via the following server directive:
:::console
server {
    listen       80;
    server_name  solar.lowtechmagazine.com;

    location / {
    return 301 https://$server_name$request_uri;
    }
}
Then we've set up SSL with the following tweaks:
:::console
# Improve HTTPS performance with session resumption
ssl_session_cache shared:SSL:10m;
ssl_session_timeout 180m;
SSL sessions only expire after three hours meaning that while someone browses the website, they don't need to renegotiate a new SSL session all the time:
:::console
# Enable server-side protection against BEAST attacks
ssl_prefer_server_ciphers on;
ssl_ciphers ECDH+AESGCM:ECDH+AES256:ECDH+AES128:DH+3DES:!ADH:!AECDH:!MD5;
We use a limited set of modern cryptographic ciphers and protocols:
# Disable SSLv3
ssl_protocols TLSv1 TLSv1.1 TLSv1.2;
We tell the visitors browser to always use HTTPS, in order to reduce the amount of 301 redirects, which might slow down loading times:
:::console
# Enable HSTS (https://developer.mozilla.org/en-US/docs/Security/HTTP_Strict_Transport_Security)
add_header Strict-Transport-Security "max-age=63072000; includeSubdomains";
We enable OCSP stapling which is quick way in which browsers can check whether the certificate is still active without incurring more round trips to the Certificate Issuer. Most tutorials recommend setting Google's 8.8.8.8 and 8.8.4.4 DNS servers but we don't want to use those. Instead we chose some servers provided through https://www.opennic.org that are close to our location:
:::console
# Enable OCSP stapling (http://blog.mozilla.org/security/2013/07/29/ocsp-stapling-in-firefox)
ssl_stapling on;
ssl_stapling_verify on;
ssl_trusted_certificate /etc/letsencrypt/live/solar.lowtechmagazine.com/fullchain.pem;
resolver 87.98.175.85 193.183.98.66 valid=300s;
resolver_timeout 5s;
Last but not least, we set change the size of the SSL buffer to increase to so-called 'Time To First Byte'4 which essentially shortens the time between a click and things changing on the screen:
:::console
# Lower the buffer size to increase TTFB
ssl_buffer_size 4k;
These SSL tweaks are heavily indebted to these two articles by Bjorn Johansen5 and Hayden James6
Setting up LetsEncrypt for HTTPS
The above are all the SSL performance tweaks but we still need to get our SSL certificates. We'll do so using LetsEncrypt7.
First install certbot:
:::console
apt-get install certbot -t stretch-backports
Then run the command to request a certificate using the webroot authenticator:
:::console
sudo certbot certonly --authenticator webroot --pre-hook "nginx -s stop" --post-hook "nginx"
Use the certonly directive so it just creates the certificates but doesn't touch muh config.
This will prompt an interactive screen where you set the (sub)domain(s) you're requesting certificates for. In our case that was solar.lowtechmagazine.com.
Then it will ask for the location of the webroot, which in our case is /var/www/html/. It will then proceed to generate a certificate.
Then the only thing you need to do in your NGINX config is to specify where your certificates are located. This is usually in /etc/letsencrypt/live/domain.name/. In our case it is the following:
:::console
ssl_certificate /etc/letsencrypt/live/solar.lowtechmagazine.com/fullchain.pem;
ssl_certificate_key /etc/letsencrypt/live/solar.lowtechmagazine.com/privkey.pem;
Full NGINX config
Without further ado:
:::console
root@solarserver:/var/log/nginx# cat /etc/nginx/sites-enabled/solar.lowtechmagazine.com

# Expires map
map $sent_http_content_type $expires {
    default                    off;
    text/html                  7d;
    text/css                   max;
    application/javascript     max;
    ~image/                    max;
}

server {
    listen       80;
    server_name  solar.lowtechmagazine.com;

    location / {
    return 301 https://$server_name$request_uri;
    }
}

server{
        listen 443 ssl http2;
        server_name solar.lowtechmagazine.com;

        charset UTF-8; #improve page speed by sending the charset with the first response.

        location / {
        root /var/www/html/;
        index index.html;
        autoindex off;
        }


        #Caching (save html pages for 7 days, rest as long as possible, no caching on frontpage)
        expires $expires;

        location @index {
            add_header Last-Modified $date_gmt;
            add_header Cache-Control 'no-cache, no-store';
            etag off;
            expires off;
        }

        #error_page  404              /404.html;

        # redirect server error pages to the static page /50x.html
        #error_page   500 502 503 504  /50x.html;
        #location = /50x.html {
        #    root   /var/www/;
        #}

        #Compression

        gzip on;
        gzip_disable "msie6";
        gzip_vary on;
        gzip_comp_level 6;
        gzip_buffers 16 8k;
        gzip_http_version 1.1;
        gzip_types text/plain text/css application/json application/javascript text/xml application/xml application/xml+rss text/javascript;


        #Caching (save html page for 7 days, rest as long as possible)
        expires $expires;

        # Logs
        access_log   /var/log/nginx/solar.lowtechmagazine.com_ssl.access.log;
        error_log    /var/log/nginx/solar.lowtechmagazine.com_ssl.error.log;

        # SSL Settings:
        ssl_certificate /etc/letsencrypt/live/solar.lowtechmagazine.com/fullchain.pem;
        ssl_certificate_key /etc/letsencrypt/live/solar.lowtechmagazine.com/privkey.pem;

        # Improve HTTPS performance with session resumption
        ssl_session_cache shared:SSL:10m;
        ssl_session_timeout 5m;

        # Enable server-side protection against BEAST attacks
        ssl_prefer_server_ciphers on;
        ssl_ciphers ECDH+AESGCM:ECDH+AES256:ECDH+AES128:DH+3DES:!ADH:!AECDH:!MD5;

        # Disable SSLv3
        ssl_protocols TLSv1 TLSv1.1 TLSv1.2;

        # Lower the buffer size to increase TTFB
        ssl_buffer_size 4k;

        # Diffie-Hellman parameter for DHE ciphersuites
        # $ sudo openssl dhparam -out /etc/ssl/certs/dhparam.pem 4096
        ssl_dhparam /etc/ssl/certs/dhparam.pem;

        # Enable HSTS (https://developer.mozilla.org/en-US/docs/Security/HTTP_Strict_Transport_Security)
        add_header Strict-Transport-Security "max-age=63072000; includeSubdomains";

        # Enable OCSP stapling (http://blog.mozilla.org/security/2013/07/29/ocsp-stapling-in-firefox)
        ssl_stapling on;
        ssl_stapling_verify on;
        ssl_trusted_certificate /etc/letsencrypt/live/solar.lowtechmagazine.com/fullchain.pem;
        resolver 87.98.175.85 193.183.98.66 valid=300s;
        resolver_timeout 5s;
}
Material Server
One of the page's design elements is to stress the materiality of a webserver. In web design there is a clear distinction between 'front-end', the visual and content parts of the website and the 'back-end', the infrastructure it runs on top. When it comes to the web or internet infrastructure outside of professional circles, the material conditions are not discussed as resources are taken for granted or even completely virtualized. A low-tech website means this distinction between front-end and back-end needs to dissapear as choices on the front-end necessarily impact what happens on the back-end and vice-versa. Pretending it doesn't usually leads to more energy usage.
An increase in traffic for example will have an impact on the amount of energy the server uses, just as a heavy or badly designed website will.
Hardware
-
Olimex Olinuxino A20-Lime2
-
16GB SD Card Class 10
-
6600mAh Lithium Polimer Battery (UPS) (24Wh)
-
50Watt 12v Solar Panel
-
Solar Charger
-
Lead Acid Battery 12v (86Wh) discharged to max 66% to avoid deep discharging thus 30Wh
-
USB to Barrel jack connector
-
Custom power measurement circuit based around arduino nano / at tiny
Webdesign
Feedback & contributions
- xmpp chatroom
- mailing list
-
https://en.wikipedia.org/wiki/Dither#Digital_photography_and_image_processing ↩︎
-
http://www.efg2.com/Lab/Library/ImageProcessing/DHALF.TXT ↩︎
-
See for example https://web.archive.org/web/20180325055007/https://bisqwit.iki.fi/story/howto/dither/jy/ ↩︎
-
https://haydenjames.io/nginx-tuning-tips-tls-ssl-https-ttfb-latency/ ↩︎